(Before & After Photos are posted below)
When Lboy was about 15-18 months old, I burned a nice little ring in the (ugly) laminate countertops while cooking dinner one night. He grabbed my ankles as I was pouring out grease & it was either burn the countertop or burn the baby. There’s really no reason to answer why I chose the counters is there?
Now that it has come time for us to sell the house, we were told that the tops needed replaced before the house went on the market. We had Lowe’s give us an estimate, we called some family friends for a referral (we discovered our solution before we got a price quote), & the money was adding up!
We have a wet bar area in our living & dining room that matches the kitchen. I thought that it would be weird if the kitchen had one color countertop & the wet bar had the original hunter green (ick!) If we were going to work with Lowe’s, we were looking at a $2000-2500 price tag. That is so much money to spent on A) Formica B) our tiny kitchen & C) on a house we plan on living in for only 2-3 more months.
About two weeks ago, I remembered that a looooooong time ago I done a lot of research into refinishing our countertops via painting them. It was a long & complicated process, but it would save us a TON of money. While I was researching that option again, I discovered Rustoleum’s Countertop Transformations. A kit designed for refinishing your countertops (recently released in 2011 according to blog posts.)
As I was reading through the instructions, watching the how-to video on the site, the reviews, & the different blogs, I was thinking that it really sounded too good to be true. The site says that it is a DIY kit made for people who really don’t have a lot of experience in doing their own home projects. The more I read, the more I was convinced that Todd & I could do this.
I checked their site, found a few locations in town that sell the kit, & picked up 2 boxes on Monday of last week.
Our thoughts:
1. BE DILIGENT about following their instructions.
We followed every.single.step. We did everything they said to do, we double checked everything, we taped everything, basically, if it was done in the video WE DID IT!
2. Get all the extras they recommend you to buy that is listed on the box (price below.)
3. The video recommends that you use a shop vac, but that if you don’t have one then a dust pan & brush will work fine. I honestly have no idea how we could have gotten this project done as quickly as we were able to without the shop vacuum. Your work will TRIPLE, maybe even quadruple without the shop vac. We spent $65 on one + an attachment piece for $15 & it was worth every penny!
4. The video gives instructions on taping down your sink drain (if you’re working on counter space that has a sink). Do this! But I would also recommend taking a clear piece of sheeting & just taping it over the entire sink. The spray adhesive did cause some of the paint chips to stick to the inside of the sink & it’s going to be a pain getting them to come unglued.
5. If you have kids, get a babysitter. We had one the first day (the kids went to grandma’s!), but the second day we thought we could handle them. Um yeah, Grandma ended up coming down to our house around 5:00 PM on day 2 & we were able to FLY through the rest of the work.
Basically, this is a “Transform your countertop for Dummies” kit. As long as you are super, super careful about following the instructions, you can not mess this up.
Day 1 took us 5.5 hours.
Day 2 was a 7 hour work day, definitely more detailed because of sanding & this sanding job had to be done super, super carefully (you don’t want to sand down all your hard work from the day before!) Like I said, a babysitter at the start of the day would have gotten this work done much faster!
What we bought:
$248+ tax Rustoleum Countertuop Transformations– 50 Square Feet or 20 Linear Feet in DESERT SAND
All the reviews & the website said that Desert Sand would be the best color to compliment ALL colors of cabinets & paint color. There are a total of 5 colors to choose from. AND….drum roll please….should you decide you want to do an entire kitchen remodel, Rustoleum makes cabinet trasnfmoration kits as well (they have several other type of of transformation kits too.) The reviews are highly complimentary & after our experience with the countertop kit, I would fully recommend the cabinet kit. (We will be using this product again in our new house if we don’t have the countertops or cabinet color I like. I will never live with hunter green countertops ever again! ;))
Also, I originally bought two boxes at $248 a piece, but we were able to return one box. Whew!!! It saved us even more money!
$65 + Tax- Shop Vac
$15 + Tax- Attachment for Shop Vac
$30- Supplies listed on the box that are NOT included in the kit
(Oh & I made Todd listen to Ace of Base & the Bangles on Pandora…. I’m not even sorry.)
(Click on photos for larger image)
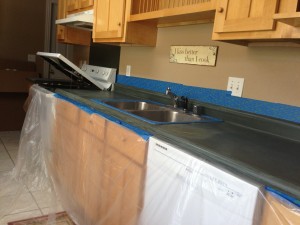
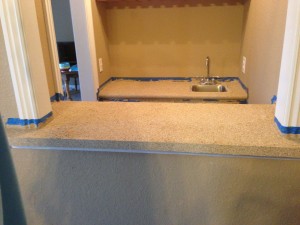
Before— we did all the sanding & then the taping. You absolutely need a couple of those clear tarps (we had these lying around the house from paint jobs.) It really helps you collect all the paint chips so you don’t waste them. We were able to pick paint chips up off the floor in order to keep adding them in places that were empty.
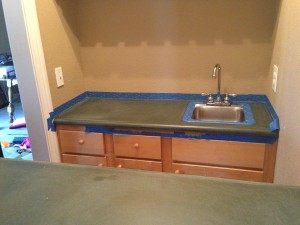
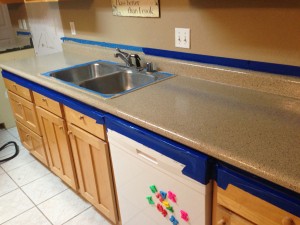
Middle— this is a picture after we did the initial base coat adhesive painting step PLUS added all the paint chips provided in the kit. You wait a minimum of 12 hours but no more than 24 hours for this step to dry. Then all the fun scraping & sanding begins.
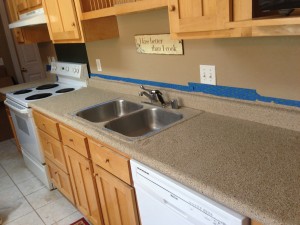
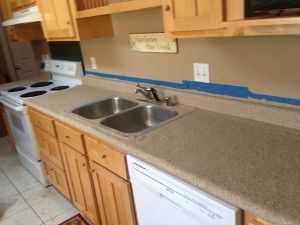
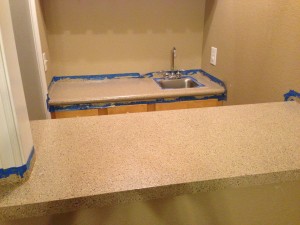
Last step— This was after the very last step was done, which was adding the clear coat. All of the reviews said that this is the one product that we would run out of, but Todd & I had zero issues with this and we were able to do 2 coats (we didn’t know if two coats were necessary or not, but since the reviews stated we would run out & we had a ton left over we were worried we had added too little.)
Once the final coat dries (4-6 hours depending on climate according to the video), we will take the tape off.
Remember, no using the countertops for 48 hours, then only light usage for the next 7 days (nothing over 5 lbs on the tops) & then you can resume regular use. I will definitely be posting a picture of the FINAL photo in 7 days! Woo hoo!
If you can’t afford or don’t want to spend the money on new countertops but you are wanting a new & better look in your kitchen you can not go wrong with this product. We had so much success with it & would definitely recommend it! Just WATCH THE VIDEO & follow all the instructions and you will do great!



Your counter tops look amazing!!! Good job!!!! I love it when you discover a much cheaper DIY way!
Thank you Hannah! I’m so excited about them! I got up this morning & checked on them & then fell in love all over again. haha I’m so proud of us for actually getting the work done. I told Todd that this had been God’s plan all along, we just had to figure it out & do the work. So far I think it looks amazing, soooo much better than hunter green!
One of my experiences was a lady that found me on the inerntet, as she explained she had a neighbor who had the same problem and she found someone to assist her. Now after the interview when she was filling out all documents as agreed, it turned out that after two or three weeks everything changed and she had to pay more than what at first was indicated. She felt deceived.This lady wanted us to explain who we work for and how long we were helping people and is our company reputable. I advised her that any futher information can be obtained from our website. It is logical that she does not want to experience something as her neighbor did, and she will check the website and call back.She is married with three children under the age of 5 years, and she wants to keep her home. Two weeks later she called me again to let me know that she still needs more information from us.I called our director Daisy Raisler, and had three way conversation on the phone. Director spoke to her and she felt more comfortable with everything as it was explained and she can also talk with the director of the helpful hands foundation.Again, two weeks later she called back to let us know that she was ready to get started on working her case. She explained that while checking our company, she found another company and after receiving the documents, she realized that it was not free as explained and found out that she had to pay to them more then her mortgage payment monthly. She was grateful because we were sincere from the first day that we spoke with her. They now feel more satified and confident that they have chosen a Non- Profit Organization that cares about the welfare of others and the community. She expressed that she wants to join our company, and be able to help others and her community with similar foreclosure and hardship situations.
Wow…that looks amazing!!!
We, too, have our house on the market, and I’m all about making due — as opposed to the big investments — until we sell. I was super proud of saving about $500 recently…every little bit counts!
I was thinking about you just over the past couple of days, knowing I hadn’t “talked” to you in a long time, hoping you were well. Now I know (at least part of!) how you’ve been keeping busy! 🙂
Hope you’re enjoying the summer with your sweet babes!!!
MandyE Most Recent Post…Pictures from The Farm and Our Weekend Getaway
THANK YOU MANDY!!! I just sent you an email!
YES, saving the $$ is a big deal isn’t it?!! Every little penny counts when getting a house on the market. Todd & I were talking about the HGTV show, “Getting it Sold” & how we felt like this was a kitchen (or even bathroom) project they would have done on their show. It is soooo cheap, but makes such a HUUUUGE difference!
Good luck selling your house!
I have seen this at the store and really want to give it a try but my counters are really old and need to be replaced instead of just painting them.
They have the sharp right angle edges to them and they’re chipped in a few places. I like the smooth curved edges much better too.
Yours turned out great and I can’t believe how much you saved doing it yourself. Great Job!!
I know right?! Tons of money saved! We have been using them for 2 weeks now & I’m still loving them. We have some touchups to do, but it’s still worth the money & the time. For what it’s worth, if you don’t ever get a chance to replace them, one our counters (I didn’t post a picture of it) has a really sharp right angle & is in a strange place. It worked just as beautifully as the straight pieces of the countertops. We also had some chipped places that needed filled in with wood putty, we let it dry & then sanded them down. You would never know that there had been any uneven places there. So if you ever need to give this a try, I bet it would work!
Wow! That looks awesome!! Definitely worth the time it took for the money you saved!
Thank you!! Definitely worth the time! We are about 2 weeks into using them & I’m still loving them!
Your kitchen is really amazing! I love it so much. Congratulations for this successful project. I am planning to remodel my kitchen soon, and this will be one of my inspirations.
Washington State Kitchen & Bath Most Recent Post…Work-a-Holics Day: A Light-Hearted Observance
Looks great! You can’t even tell where the counter was burned. It’s a good fix since you don’t plan to be in the house for much longer!
Brian Most Recent Post…Brand New Granite Slabs Straight from Brazil